On this page
- What can an EmDash popup be?
- Install the plugin
- Add a top bar for news
- Make a sign-up popup with a form
- Change a popup later
- Open a popup when someone clicks
- Choose the colours
- Set dates and preview
- See how a popup is doing
- Compare your popups
- See which popup brought a sign-up
- What it does not do
- If something goes wrong
The plugin is called Popups. It’s free and needs no account. It also decides the polite parts for you: when a popup may open, and when it must stay shut.
Coming from WordPress?
This replaces Popup Maker, OptinMonster, Hustle, Elementor Popups and the notification-bar plugins.
- There is no page builder and no custom CSS. Every popup shares one look. Colours: your theme’s, a ready-made set, or your own.
- It doesn’t build forms. You make the form under Forms, the official EmDash forms plugin, and name it in the popup.
- The polite rules can’t be switched off. At most one popup or slide-in opens by itself per visit, and a popup waits for a visitor’s second page.
- You choose plain words such as “after they have read a while”, not seconds or scroll percentages.
What can an EmDash popup be?
When you make one, you pick one of four kinds:
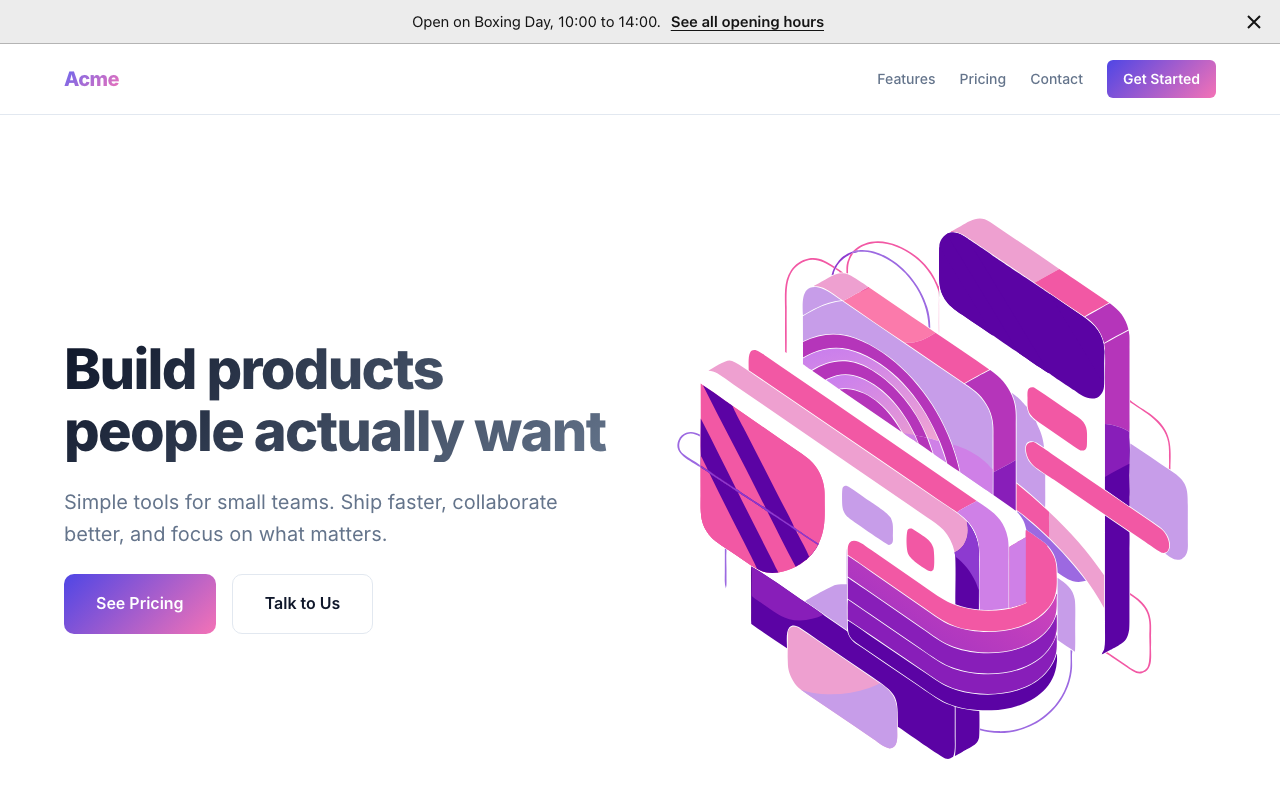
- Top bar: a thin strip above the header, for short news such as opening hours.
- Slide-in: slides in at a bottom corner by itself. The rest of the page still works.
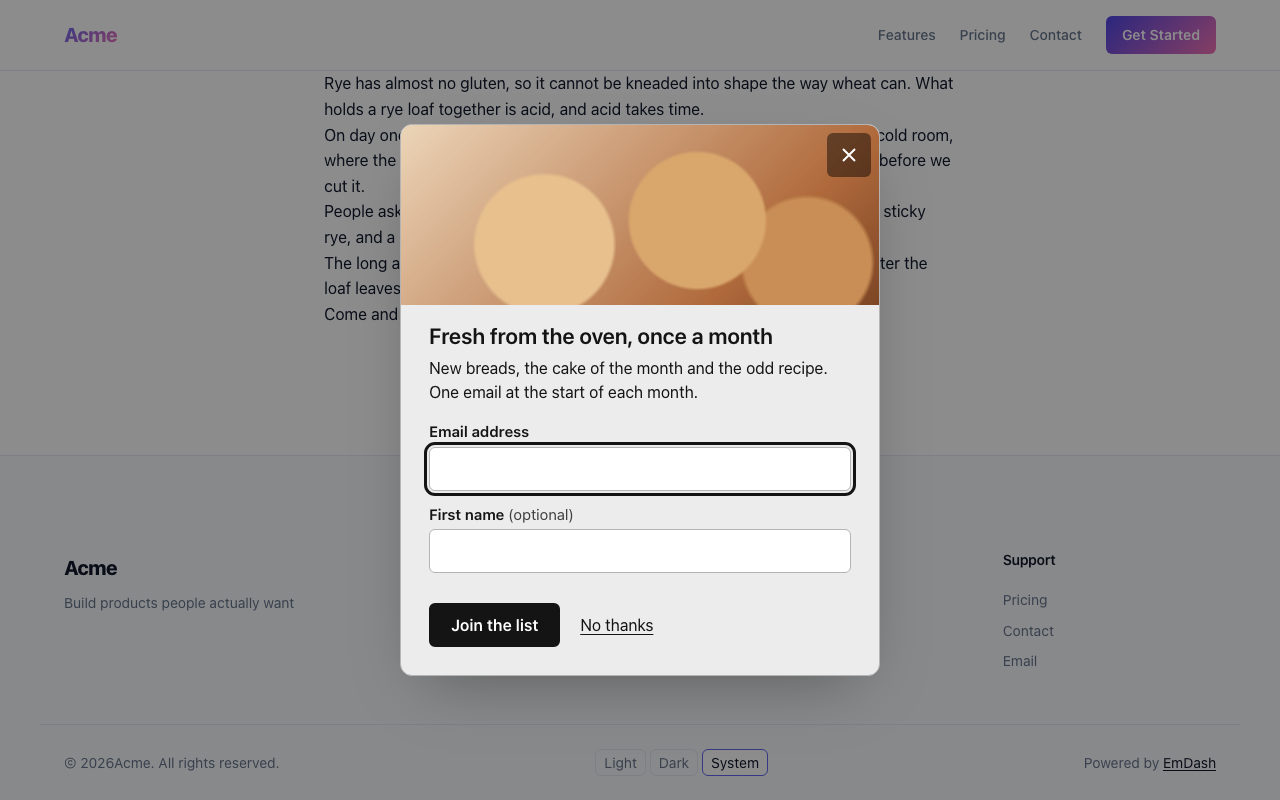
- Popup: opens by itself over the page, in the middle of the screen, and dims the page until it is closed. On phones it opens as a sheet across the bottom, unless the visitor opened it with a link.
- Box in a page: sits inside a page or post, where you place it while editing, for example a sign-up box at the end of a post. It is the only kind you place; the others open by themselves.
Each one shows a heading and a short text. It can also show a picture from your media library, and either one button or a form.
Install the plugin
This part is done once, in code. Ask whoever looks after your site’s code to install the plugin and add it to astro.config.mjs. Add the forms plugin too if you want sign-up forms. Popups needs EmDash 1.3.0 or later. Forms need version 0.2.11 or later of the forms plugin. It is not in the EmDash registry, because the registry only takes plugins that cannot add scripts to pages.
npm install @moorage/plugin-popups @emdash-cms/plugin-forms// astro.config.mjs
import { formsPlugin } from "@emdash-cms/plugin-forms";
import { popupsPlugin } from "@moorage/plugin-popups";
import { defineConfig } from "astro/config";
import emdash from "emdash/astro";
export default defineConfig({
integrations: [emdash({ plugins: [formsPlugin(), popupsPlugin()] })],
});The theme must include EmDash’s standard page parts: <EmDashHead>, <EmDashBodyStart> and <EmDashBodyEnd>. Every EmDash template already does. Everything after this is done in the admin.
Add a top bar for news
- In the admin sidebar, open Marketing, then Popups.
- Click New popup.
- Type a name in Name (only you see it), such as “Boxing Day hours”.
- Choose Top bar.
- Click Next: what it says.
- Write your news in Message (up to 60 letters), for example “Open on Boxing Day, 10:00 to 14:00.”
- If you want a link, fill in Link words (optional) and Link. A page on your own site looks like
/hours. - Click Next: when and where. Leave Every page and Phones and computers as they are.
- Click Next: dates and turn on.
- Check the Turn it on switch. It is already on, so the bar goes live when you save. Turn it off if you aren’t ready.
- Click Save and finish.
You should see that “Boxing Day hours” is ready and on, and the list shows its status as On. Open your site in a private window. The bar sits above the header, with a close button on the right. Pages are cached, so changes can take a few minutes to reach visitors.
If you stop half way, the list keeps it as Not finished; click Edit to carry on.
Make a sign-up popup with a form
First make the form.
- In the sidebar, open Marketing, then Forms, and click New Form.
- Type “Newsletter” in Name. The Slug, the form’s short name, fills in as “newsletter”.
- Click Add Field.
- Type “Your email” as the Label.
- Set Type to email and tick Required.
- Set Submit Button Label to “Sign up”.
- Click Create Form.
Now make the popup.
- Go back to Popups and click New popup.
- Name it “Monthly letter”.
- Choose Popup and click Next: what it says.
- Fill in Heading and Text.
- Under It contains, choose A form from Forms.
- Under Form, choose Newsletter, and fill in the Thank-you heading.
- Click Next: when and where.
If the plugin can’t list your forms, it shows a box for the form’s short name instead. Type newsletter. If the name is wrong, nothing is saved and you see “There is no form called…”.
- Keep After they have read a while (recommended). That means 40% down the page or 30 seconds, whichever comes first.
- Click Next: dates and turn on.
- Click Save and finish.
On a visitor’s first page, nothing opens. On their second page, the popup opens once they have read a while. After someone signs up, the thank-you heading shows, and they aren’t asked again. Their email address appears under Marketing, then Submissions.
To send sign-ups on to your inbox, HubSpot, or a newsletter tool through Zapier, Make or n8n, add Lead Delivery. It sends on each one from the form and keeps a log.
Change a popup later
In the list, click Edit next to a popup. Its page starts with ← All popups, the name and one line saying how it is doing, such as “On · Popup with a form · every page, after they have read a while”, with Turn off (or Turn on) beside it. Then come Preview on your site, its Results and, under Edit, one form for what it says, when and where it opens, and its dates.
- Change what you need, anywhere in the form.
- Click Save changes once, at the end of the page.
If something can’t be saved, nothing is saved and every problem is listed together at the top. What you typed stays in place, so fix it and click Save changes again.
The name and the kind are under More, then Change name or kind, on a screen of their own, because the kind decides which settings the popup has. What it says, where it shows and its dates are kept. Duplicate is under More too. Turning a popup on or off keeps anything you typed but haven’t saved. Delete popup is at the very foot of the page, and asks first.
Editors can change the words, the picture and the dates, and turn a popup on or off. Only admins see when and where it opens, the form, Change name or kind and Delete popup.
Open a popup when someone clicks
You can make a popup open only on a click, for example from a “Newsletter” menu item.
- In the list, click Edit next to the popup.
- Under When it opens, choose When they click a button or link.
- Click Save changes at the end of the page. The page now shows instructions for your web person with the popup’s link, such as
/#popup-monthly-letter. - Open Menus, edit Header and click Add Custom Link.
- In URL, type
/#popup-monthly-letter, with a slash in front. The field refuses an address that starts with#.
Clicking the menu item now opens the popup on any page, even the first one. A web person can also add data-popup="monthly-letter" to any button.
Choose the colours
Every popup shares one look, set once for all of them by an admin. Open the Settings tab of the Popups page. Under Look, pick Light or dark, then one of the Colours:
- Your theme’s colours (recommended): the colours your theme sets for popups, or calm neutral ones if it sets none.
- One of five ready-made sets, such as Warm cream with brown buttons or Clean white with blue buttons. The light ones each have a matching dark version for visitors whose device is in dark mode; Dark with gold buttons is dark on every device. Every one is easy to read.
- My own colours: a background, a text and a button colour, used in light and dark mode alike. Colours that are hard to read are refused, with the reason.
Press Save the look. The cookie banner of Analytics & Cookies offers the same sets, so the two can match.
Set dates and preview
The last step of a new popup has Starts on and Ends on, each with a time. On a finished popup’s page they sit at the end of the form, just above Save changes. The times use your site’s time zone, which the step names, for example “Times are Europe/London time, your site’s time zone.” To change it, go to Settings, then General, then Timezone.
To check, click Preview next to the popup in the list, then Preview on your site. The same button is at the top of the popup’s own page; it shows what was last saved. Your site opens with the popup showing, for you only. A note at the top says whether a real visitor would see it, and if not, why. For example: “Hidden for a real visitor: it starts on 20 Oct, 09:00.” Nothing is counted, and the form doesn’t send.
See how a popup is doing
- In the list, click Edit next to the popup.
- Results opens on Last 30 days. For another period, change Period, for example to This month.
You see two numbers: Sign-ups (Button clicks for a popup with a button) and Rate. Each says how it changed from the period before, such as “up from 35”. Below them is a chart of sign-ups or clicks a day, and one line with how often the popup was seen and closed.
“Seen” means at least half of the popup was on screen for a second. Your own visits while signed in aren’t counted. The rate and the changes show from 100 views, because small numbers swing too much. The other periods are This month, Last month and Since it started. Days follow your site’s time zone.
To keep the numbers, press Download CSV under the chart for its daily counts. The link works for ten minutes, so if it has expired, open the page again. Nothing about any single visitor is kept.
Compare your popups
Press Compare popups under a popup’s chart, or open the Results tab at the top of the Popups page. Under How your popups compare, every popup sits on one row for the same period, with its seen, sign-ups or clicks, rate, closes and the share seen on phones. Click the Seen or Rate column to sort by it. Download as a spreadsheet (CSV) gives the daily counts of all of them.
See which popup brought a sign-up
Forms keeps only the fields a form has. Give the form a hidden field, and Popups fills it in when someone signs up through a popup.
- In the sidebar, open Marketing, then Forms, and click the Edit button (the pencil) next to your form.
- Click Add Field.
- Type
utm_campaignas the Label. The Name fills in asutm_campaign. - Set Type to hidden.
- Click Save Changes.
Each sign-up through a popup now carries the popup’s short name, such as monthly-letter, under Submissions (in the list, and when you open a sign-up) and in Lead Delivery. Forms leaves hidden fields out of its own emails and its spreadsheet download. Add utm_source, utm_medium and page_url the same way if you want them: they say popups, the kind of popup, and the page it was sent from. The same form used outside a popup leaves them empty.
What it does not do
There are no A/B tests, countdowns, “spin to win” wheels or full-screen takeovers. You can’t change colours or fonts for one popup. There is no automatic box after every post: you place the Popups box block yourself.
It never opens while the Analytics & Cookies banner is waiting for an answer.
The plugin’s notes list three more rules we haven’t tested:
- It never opens while someone is typing.
- “When they are about to leave” works on computers only.
- Forms that use Cloudflare Turnstile or a file upload work only in a box in a page, not in a popup.
If something goes wrong
A popup with a form never opens. Open Popups. A warning at the top names the problem, such as “its form “newsletter” is paused under Forms”. It opens again by itself once the form is back on. To get an email when this happens, add addresses under the Settings tab, in Emails when a popup cannot open.
You can’t see your popup. Use Preview. The note says why, for example “this browser closed it today; it shows again after a month”.
Your popup is not in the list when you add a Popups box to a post. The list, Which box (made under Popups as “Box in a page”), shows only popups of the kind Box in a page. Popups, slide-ins and top bars open by themselves and are not placed in a post. With no box yet, the list says how to make one, for example “No boxes yet. Your 2 popups and top bars open by themselves and are not placed here.” Make a new one under Popups and choose Box in a page, or ask an admin to change the kind with Change name or kind. A box that is turned off shows with “(off)”.
A menu link to the popup is refused. Type /#popup- then the name, with the slash in front.
No popup appears on any page. Ask your web person to check that the theme includes EmDash’s page head and body parts.
Every setting is on the Popups plugin page. To set up a cookie banner, see How to add Google Analytics and a cookie banner to an EmDash site. Related: How to send EmDash contact form enquiries to email, HubSpot or Zapier.
Stuck on a step? Email hello@moorage.dev.
What should we make next?
Tell us the job you would like a plugin to do. We read every answer and use your email only to reply to it; release emails come only if you tick the box.